Easy Localization: A Simple Guide to Internationalizing Your WPF App
Want to reach more users with your app? Making it available in multiple languages is a great way to expand your user base. In this easy-to-follow guide, we’ll walk you through the steps to add localization to your WPF application.
We’ll be using Avalonia UI and Rider in our examples, but the process is similar if you’re using Visual Studio or standard WPF. We’ll work within the MVVM (Model-View-ViewModel) pattern using data binding.
What We’ll Achieve
We’ll create a configuration that allows users to select the language of the application — for example, choosing between English, Spanish, and Portuguese. This selection will change elements like the text in the app’s menu, making your app accessible to a broader audience.
Creating the Translations
Step 1: Create a Resources Folder
First, create a folder named Resources in the root directory of your app. This folder will hold all the resource files for different languages.
Step 2: Create Resource Files for Each Language
Inside the Resources folder, create a resource file for each language you want to support:
Strings.en.resxfor EnglishStrings.es.resxfor SpanishStrings.pt.resxfor Portuguese
Why Use .resx Files Instead of JSON or YAML?
A .resx file is an XML-based resource file used in .NET applications for storing strings and other resources. Here’s why we use .resx files:
- Built-in Support: .NET provides built-in support for
.resxfiles, making them easy to use and manage. - Strong Typing: When you use
.resxfiles, you get compile-time checking, which reduces runtime errors. - Ease of Localization:
.resxfiles are designed for localization, allowing you to manage different languages efficiently. - Tooling Support: Many development tools offer features that simplify working with
.resxfiles.
While JSON or YAML could be used for storing strings, they lack the specialized support and features that .resx files offer for localization in .NET applications.
Step 3: Use Rider’s Localization Manager
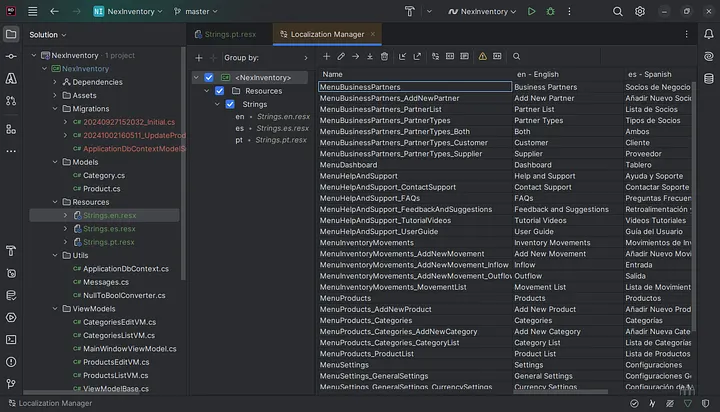
If you’re using Rider, you can utilize the Localization Manager to work with your resource files easily:
- Open the Localization Manager in Rider.
- You’ll see the first column listing the resource keys (variable names).
- The following columns represent each language you’ve added.
- You can input the translated text for each key directly in the grid.
This tool makes it simple to keep your translations organized and consistent across different languages.
If You’re Not Using Rider
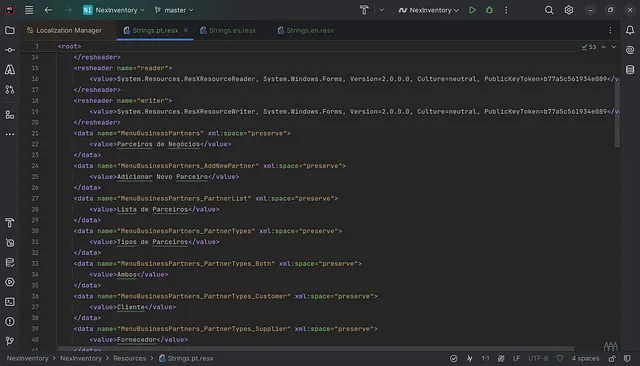
No worries if you’re not using Rider! You can create and manage .resx files manually. A .resx file is simply an XML file that contains key-value pairs, where each key is a variable name, and each value is the corresponding text in a specific language.
- Edit the Files Manually: Open each
.resxfile with a text editor or your IDE. The structure of a.resxfile looks like this:
<?xml version="1.0" encoding="utf-8"?>
<root>
  <data name="MenuFile" xml:space="preserve">
    <value>File</value>
  </data>
  <data name="MenuEdit" xml:space="preserve">
    <value>Edit</value>
  </data>
</root>- Add Your Translations: For each piece of text in your app that needs translation, add a element:
name Attribute: This is the key or variable name you’ll use in your code.
- Repeat for Each Language: Make sure that each
.resxfile has the same keys but with values translated into the respective language.


By manually editing the .resx files, you’re doing exactly what tools like Rider’s Localization Manager do behind the scenes.
How to Use It in the App
Step 1: Create a Localization Service
We’ll create a service that loads the appropriate resource file based on the selected language.
LocalizationService.cs
using System.Globalization;
using System.Resources;

public class LocalizationService
{
    private ResourceManager _resourceManager;
    private CultureInfo _currentCulture;

    public LocalizationService()
    {
        _resourceManager = new ResourceManager("YourAppNamespace.Resources.Strings", typeof(LocalizationService).Assembly);
        _currentCulture = CultureInfo.CurrentCulture;
    }

    public string GetString(string key)
    {
        return _resourceManager.GetString(key, _currentCulture);
    }

    public void SetCulture(string cultureCode)
    {
        _currentCulture = new CultureInfo(cultureCode);
    }
}
Explanation:
- ResourceManager: Manages access to culture-specific resources.
- GetString: Retrieves the localized string for the given key and current culture.
- SetCulture: Updates the current culture based on the selected language.
Step 2: Modify the Main Window to Change Languages
We’ll add a command to the main window to change the application’s language.
MainWindowViewModel.cs
using System.Windows.Input;
using CommunityToolkit.Mvvm.Input;

public partial class MainWindowViewModel : ViewModelBase
{
    private readonly LocalizationService _localizationService;

    public MainWindowViewModel()
    {
        _localizationService = new LocalizationService();
        ChangeLanguage("en"); // Default Language
    }

    public string MenuDashboard => _localizationService.GetString("MenuDashboard");
    public string MenuProducts => _localizationService.GetString("MenuProducts");

    public ICommand ChangeLanguageCommand => new RelayCommand<string>(ChangeLanguage);

    private void ChangeLanguage(string languageCode)
    {
        _localizationService.ChangeLanguage(languageCode);
        OnPropertyChanged(nameof(MenuDashboard));
        OnPropertyChanged(nameof(MenuProducts));
    }
}
Explanation:
- _localizationService: An instance of
LocalizationService, which handles fetching localized strings based on the current language. - MenuDashboard and MenuProducts: These are read-only properties that fetch localized strings using the
_localizationService. Whenever the language changes, these properties will provide the text in the selected language. - ChangeLanguageCommand: An
ICommandthat takes a string parameter (the language code). UsesRelayCommandfrom the Community Toolkit MVVM to bind actions to the UI. When executed, it calls theChangeLanguagemethod. - ChangeLanguage(string languageCode): Updates the current language in the
_localizationService. Calls OnPropertyChanged for MenuDashboard and MenuProducts to notify the UI that these properties have changed, prompting the UI to refresh and display the text in the new language.
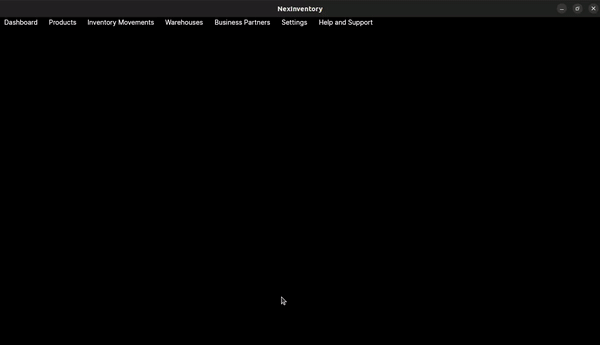
Step 3: Bind the View to the ViewModel
In your XAML file, bind the UI elements to the ViewModel properties.
MainWindow.xaml
<Menu>
    <MenuItem Header="{Binding MenuDashboard}" />
    <MenuItem Header="{Binding MenuProducts}" />
    <MenuItem Header="Language">
        <MenuItem Header="English" Command="{Binding ChangeLanguageCommand}" CommandParameter="en" />
        <MenuItem Header="Español" Command="{Binding ChangeLanguageCommand}" CommandParameter="es" />
        <MenuItem Header="Português" Command="{Binding ChangeLanguageCommand}" CommandParameter="pt" />
    </MenuItem>
</Menu>
How It Works Together:
Changing the Language
- When a user selects a new language in the UI (e.g., by clicking a menu item), the
ChangeLanguageCommandis executed with the selected language code (like “en”, “es”, or “pt”). - The
ChangeLanguagemethod updates the_localizationServicewith the new language. OnPropertyChangedis called for each property that depends on localized strings, ensuring the UI updates to reflect the language change.
Data Binding
- The UI elements (like menu items) bind their Header properties to
MenuDashboardandMenuProducts. - Since these properties fetch their values from
_localizationService.GetString(), they always provide the text in the currently selected language.
Conclusions
Congratulations! You’ve added localization to your WPF application. This straightforward solution allows you to support multiple languages, making your app accessible to a wider audience.
Of course, there’s room for improvement:
- Importing Translations: You could import translations from a CSV file to simplify managing large numbers of strings.
- Refactoring: Delegating responsibilities to additional classes can make your code cleaner and more maintainable.
- Advanced Localization: Consider handling right-to-left languages or pluralization for a more comprehensive localization.
Take this guide as a starting point in the internationalization of your apps. Happy coding!